Neatly starting and stopping free-motion machine quilting is something everyone should learn how to do. I sew on a high-end computerized machine, and when I was a novice free-motion machine quilter, I thought, “My machine has a “fix” button to tie threads when starting and stopping, I’ll just use that!” Well, I ended up with knots on the back of my quilt everywhere I started and stopped… you could feel and see them.
Next, I tried the automatic cutter on my machine. That worked great… no knots; however, then I had to clip all of those threads on the back of the quilt… hundreds of them! (The machine leaves about a ½” “tail” of thread when it cuts.) And, sometimes those tails would get tangled in the quilting, making them hard or impossible to cut.
This tutorial will show you how to stop and start your quilting while cutting the threads as you go. The end result will be that once you have finished machine quilting, you won’t have any threads to cut!
Starting quilting:
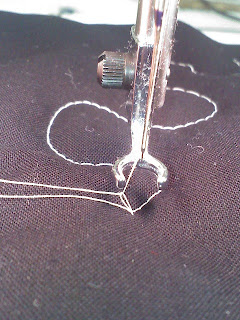
- When you begin free-motion quilting, you will use the hand wheel or, if your machine has this function, tap the foot pedal once to bring the needle down and then up one time. Bringing the needle down and then up again once will allow it to catch the bobbin thread and bring it to the top. (Figure 1)
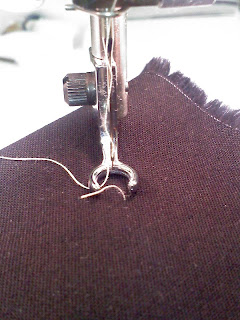 |
| Figure 1. Bobbin thread drawn to top |
- Once both threads are on top of the quilt, grab them both with your left hand and hold them taut. (Figure 2)
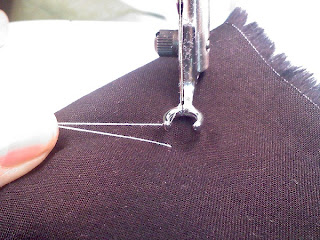 |
| Figure 2. Holding both top and bobbin threads |
- Begin free-motion quilting by taking 5 or 6 very small stitches in place at the beginning.
- Stop and cut the loose threads you are holding in your hand close to the quilt top. (Figure 3)
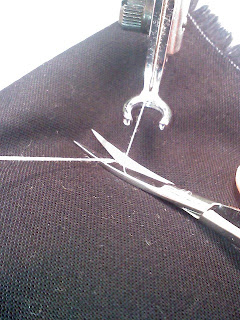 |
| Figure 3. Cutting threads before beginning to stitch |
- Continue free-motion quilting until you need to stop.
Stopping quilting:
- When you get to where you want to stop, again take 5 or 6 very small stitches in place.
- Stop the machine with the needle in the up position.
- Grab the top thread and pull it out and inch or so with your left hand (you may have to release the tension if it is set very tight). (Figure 4)
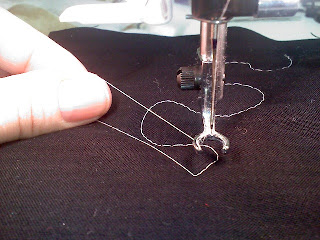 |
| Figure 4. Holding thread loop |
- While holding onto the loop of thread you grabbed in step 3, use the hand wheel or tap the foot pedal to lower and raise the needle once. The needle should be in the up position again.
 |
| Figure 5. Bobbin thread pulled to the top |
- Pull on the loop you are holding so that it brings the bobbin thread to the top of the quilt. (Figure 5)
 |
| Figure 6. Cutting threads when finished quilting |
- Cut both the top and bobbin threads close to the quilt top. (Figure 6)


